Saturday, June 29, 2013

More blooms


Unpacking is hard work.


Not sure if I need more or less coffee in my cup to stay right side up. Andy is working at snow farm so I am left to battle my own work ethic. Blogging is more interesting than unpacking. Even with little to report.

Wednesday, June 26, 2013

Sunday

So we haven't gotten a chance to update about the end of the long weekend because it was so super productive. We are also in the final phase of cleaning in our Northampton apartment. It's intense taking care of two places at once but soon we will focus our energy up here. So, all in all the long weekend was really productive but Sunday was the best by far. Among the smaller accomplishments, I mounted the toilet paper holder and corner cabinet in the downstairs bathroom.

I am learning to use lots of new tools and I make the very best concentration faces.  

The hammer and driver are the only tool use documentation from Sunday but I swear I used the jig saw and chop saw. Not the "clircular" saw- that one is "too sharp" and "just for real work men like Andy" according to a little boy in my class. Besides the reward of having a more structurally sound home to live in, I am getting some great material for stories to share at school. I have a fan club of three year olds (mostly boys) fascinated by the number of tools in have at my home!


And a "real work man" too!

Here is the beam and subfloor in place:


I am clearly inspecting the quality work with a well trained eye. It passed my inspection.

One other mini side project of the day was straightening out a band joist (I am making  that word up but I think that sounds like something Andy might call it). We had to pop over to the neighbors for a socket wrench extension. Andy held the other side from the basement while I cranked the wrench by reaching under the deck. The difference is substantial:
The top is before and bottom is after.  I did that!

Tha peonies have popped and they make hammock laying even better- I didn't know that was possible! 


Saturday, June 22, 2013

Hemlock and Tar

After an early and running start this morning Andy realized he could be more productive if we picked up some additional supplies. So off we went to get a sister beam for between the French doors. Here she is riding home:
Who's driving this crazy Buick?! Oh it's parked. Andy was talking about white oak logs with someone who probably didn't really care when I snapped the top pic.

After hitting up Florence hardware for some additional goods we got a buy one get one free pizza lunch for the drive home. When we returned home I quickly started wiggling our belongings into more or less the places where they might live and then volunteered myself or an awful, awful job: applying tar coating to the foundation that my family had helped expose last weekend. This is what we are working with here:

It's the worst. The absolute worst. The brush kept coming undone and holes I had filled with the stuff kept reappearing. A real test of mental and physical strength this job. I hate even writing about it. It's not slower than molasses up a hill in January to me anymore. It's slower than tar on a foundation wall in June. 

 
It's finished now. Andy is hoping to have the French doors reinstalled today or tomorrow. I am glad to be able to do jobs like this one that don't require a carpenters brain. My body is much better suited for the organizing in home though. So back to that!

Thursday, June 20, 2013

And the band plays on

So after digging out all the dry-rotted and insect-eaten wood that was pretending to hold up an end of our house, I finally had the joy of permanently putting in clean wood.
First, the weird bottom sill, which is now a pressure treated 2x4 for the first time:
 Not having a Ramset, or whatever the tool is called for anchoring wood to concrete, I used PL adhesive. This will be largely responsible for keeping bugs from crawling under. Not that they won't find another way...
I also made use of the 20-ton jack as a clamp, providing downward pressure against the sill from the header above. It was really good for my psyche to see some clean wood in there!
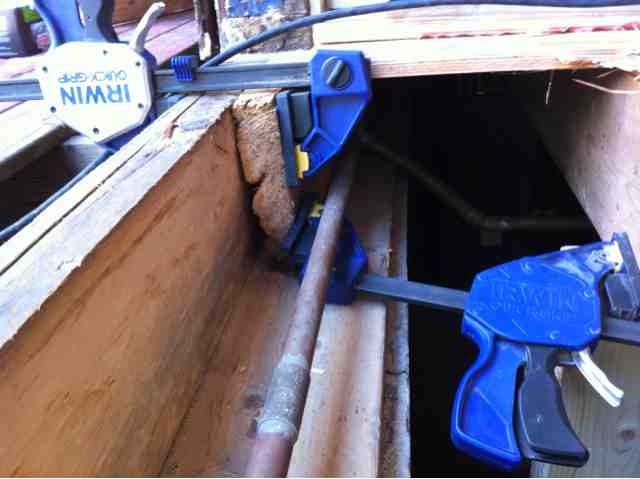
Next, the more typical 2x8 sill, again pressure treated for the first time:
This piece I notched around the end of the carrying beam in the basement. Keep in mind that the post seen here is temporary. I also intend to put in one of those adjustable lally columns just under the end of this beam in the basement. I can tell that there is water damage there, but I can't tell how deep in the end grain if the triple 2x10 it goes. 
Finally, the band joist or maybe you like "box beam," and what I have been referring to as its sister:
This was a struggle as the kiln dried Fraser fir that was used in the early 70's had an ever so slightly different dimension to it. This certainly wasn't my finest work, but it is surely a whole lot better than it ever had been in this spot.

  This means that I am finally back up above the deck ledger! For now! I still need to put in the sheathing under the opening, and re-bolt the ledger to the joists through 3/4" spacers. All of that should be child's play compared to removing the same to get at the sills!

After wondering through this all how much I needed to push the header back up, I came to a good finding today. Measuring the trimmer (I think... I have a really difficult time with names of framing members...) studs on either side of the opening would give me the intended height in the center, obviously. So a quick whip of the tape measure shows me that even what I thought had been a fairly pre-loaded temporary post could be a full half-inch longer! Amazing! This place really sagged! But having seen what I have seen so far, I am not surprised!

I now have a gameplan in place, and I am sure one more solid day on this project will find me ready to throw the door units back in and move on to something else! 


In case anyone is reading this that has lent or handed down or extendedly loaned tools to me in the past, MANY THANKS! I could not do any of this work without them. Further, if anyone wants to pass down a Fein multi-master, well that would be just swell! 

That's all for now. Tonight we continue the schlep of belongings from our apartment in Town to our home in the Country.

1love
Andy


Starting a long weekend

Today is Thursday and I have taken today and tomorrow off for some long weekend house projecting. This is what Andy sketched as a possible end result (the mud room fell off the page):
It's a good follow up to his exploratory digging mission because a lot of what might change the face of the house is my idea for a little nook/alcove type area where the deck off the master bedroom currently is - Andy sees some structural gains by making that area indoors but I will let him explain it. I just see that we could use the newer sliders downstairs where they would actually be walking through regularly and have a great, sunny little book reading/lounging area of the bedroom! 
Alright, off to a productive start...

Tuesday, June 18, 2013

Exploratory digging

So with nothing better to do (ha), I decide to see what is under the rolled roofing material on the balconies.
The answer is: not much. There is some old impregnated felt (or something) and some loose granulate that at one time must have been tarred to the felt. After that, it's one layer of completely punked sheathing, and the joist bays. 

If you look carefully, past the side if the beam in the living room, you can see the the stripe on one of the parts of my lathe in the basement!
At least I'm not finding ants. I know they must be here though. If I don't have trouble yet with mold, I will by the time this is all over!

1love
Andy

Hippie B*)($#@t

Our house is full of what my good friend Peter Meerbergen would call hippie work, or some such variation (see the title of this post). Well I say, why not fight the power with some of my own?
The whole thing is a jigsaw puzzle in reverse. I figure I will have to resort to this type of move now and then, in order to close up one project and move onto the next. Otherwise, I would end up taking apart the whole house before making any repairs.

You can see the level of decay in the band joist between my feet. It feels really good to put some clean dry wood back into my house, even if it is quite a bit less than ideal.

1love
Andy

Monday, June 17, 2013

Berries


Keep digging, Watson!

Hello again kind sirs and madams.
This is a tricky one to describe, so bear with me..
I really didn't know where to start ripping out the rotten/eaten band joists and potentially (eventually) sill. The ledger for the deck is bolted through the sheathing and band joists, making this a tough one. Maybe the only thing to have saved me is that the ledger sits on 3/4" standoffs made of wood.
They can be seen here as we see, from left to right, decking, deck joists (more substantial than the house!), ledger, standoffs, 5/8" sheathing, 2x8band joist, what I am calling its "sister," and then the sill, with a 3/4" copper water line to complicate things.

Since the deck ledger is lag bolted through everything I need to remove, I thought a good place to start was by supporting the ledger from the ground with temporary supports.

I smacked myself and immediately made one just to the left when I realized what it meant physically that the ledger broke in the middle...

Having some unusual presence of mind last night, I doubled back after picking up a few demo blades for my sawzall to grab a metal blade. This was the ticket to getting the standoffs out of the way once the lags were undone. Sorry folks action shots can only happen after normal preschool hours! 
(I found a second vacuum hose to be great in re-directing the shop vac exhaust into the basement!)

This was the view after removing what was left of the sheathing, and trimming back the two band joists and the main sill to a point well past the rot, in a staggered fashion:
Seeing that the sister joist was a short section, I ended up just taking it out. It is clear by the haggard sawzall cuts that someone has done this repair before. Rest assured, there is plenty of other evidence that it occurred, but no evidence that it was done correctly, or with any attention to what actually caused the problem in the first place...

Here is the possibly original sister as it returns to the corner, never having been fastened down to the sill, and having been pushed out by frass from our carpenter ant population. It is stressing the copper as it turns to go up to the baseboard radiator just in the shadow if this photo:
Here is probably 650-700 lbs of force trying to right it after jacking up the beam to the right:
It was a flawed plan, as the next joist took half that force, but I will likely resort to carriage bolting it from the outside.
Here's the scene now, with the foundation exposed:
This is the first poured foundation I have seen with a step on the top of the wall To accommodate a 2x4 under the typical sill. No pressure treated sill material was used. Nothing seems to have been bolted down, at least I haven't yet seen evidence during my dig.

Here is my next dilemma: 
How to get some sturdy band joist material under this neighboring wall, such that the break in the joist isn't right under the double stud in the wall... I would like to be able to button up the French doors knowing that fresh material extends underneath the wall, rather than digging in under the doors again. This is especially worthwhile as the door casing will be fixed to the double stud before the material underneath is replaced. 
Ideally, I could replace the joists along one whole side at a time. Maybe that's the move...
I already have the 20-ton jack in place to carry the header in case I decide to dig under the wall. The bummer really is the baseboard heaters in this case. 

Oh, surprise! It's pouring rain again! 
Good thing Sarah suggested I temporarily install our new chimney cap while we wait to have the flue cleaned prior to installing our new liner:
(The monster in the center is our Woodstove)
This way, in the meantime, it doesn't pour rain down our flue making the whole house smell like a wet firepit.

Ok this has been plenty of info to digest. 
Ta ta for now!

1love
Andy


Saturday, June 15, 2013

A new one on me


I can't say I've ever seen this happen. I hope everyone is ok! 

The damaged package in question was 10 1/2 gallons of chemicals I was going to use to combat moisture and cat pee in the basement! 

1love
Andy

Updates and family ties

Well hello there.

So quite a bit has gone on since my last bloast. Here is the skinny...
I cut a hole in the floor, and removed some extra flooring so that I could have access to the carrying beam in the basement. I then located the next nearest floor joist, and used it as a good spot to pump up a temporary stilt, using Chadd's 20-ton bottle jack. I don't know yet quite how far up I need to lift this "gable" end (Mansard style homes don't have gables, per se, but this would be one of the two narrower sides). Basically, there was nothing left where the center post under a major header loaded onto the first floor. 


Just wait til I post some photos of the "framing" I have found in the second floor...!

In the meantime, here are some things we have going on:
Sweet sweet strawberries in the garden
Some beans that are starting to reach for the trellis

Here is the second floor carrying beam lifted up and set back down on a temporary triple 2x4 that loads down through the floor onto the first floor carrying beam in the basement. The temporary stilt was later plumbed as redundancy.


Here was an early view of the rot under the west end sliders. Seen here is mostly the sheathing haing been torn away.

Here is our work party enjoying lunch. Cousin Isaac, wife Sarah, cousins Amanda and Rachel, and uncle Matt!

French door units removed, and some flooring and subfloor gone. The band joist and its sister having to be replaced at least under the ten feet of doors...
Here is a medium-bad spot. From left to right, it's PT decking, PT deck framing, some kind of spacer/standoff, 5/8" sheathing, 2x8 band joist, 2x8 sister (for lack of a better term), then we have some hot water pipe and the sill. The bottom of my temporary post is sitting on a 2x6 scrap which is laid flat on the carrying beam in the basement.
Another first for Sarah this month. Check out her expression!
...and the end result!


I'm totally jealous. 

That's all for now

1love
Andy

Thursday, June 13, 2013

Home Depot vs Pizza

Yesterday after I got home from work we made a mad dash to Home Depot to get more supplies for addressing the rot and subsequent sag around the first floor beam. With supplies from Chadd, Andy will be ready to roll once we have a sunny day! 

In sharp contrast with our last minute run to Pittsfield, this is what this evening looks like:
Andy on a third slice of pizza skimming Audels Carpenters and Builders Guide and I am knitting by the fire. I am working on a pair of socks I started this winter for a friend's baby. I thought this was the second of the pair but the first is no where to be found in my knitting bag... Maybe it will turn up as we clear out of the Perkins Ave apartment.

The two rocking chairs were a must have necessity for enjoying the wood stove. I am glad we brought them up. No doubt about it. We can't wait for the stainless flue liner to come in the mail! Major upgrade. Although hopefully by the time it comes we will be back to regular summer temperatures and will not test it out until the Fall!

In other news, what is this? Purple kohlrabi?! I have no idea. 

Anyway, Bread Euphoria pizza night 1, Home Depot 0. Better luck next time Home Depot.

Sunday, June 9, 2013

If it ain't broke

Here is Sarah using a motorized piece of equipment, AND mowing a lawn! Two firsts in one bundle! 

When I finally got a turn, I wasted little precious time destroying part of our mower when an errant stone from the firepit reared its ugly head. Sure I was cutting kinda close, but this guy was out on his own in the 12+" grass. I managed to bend both ends of the blade out of service and just decimate my sharpening job (which, until just then, was performing admirably!).

It had just begun running very erratically, anyways. So today I started in with the service manual, and quickly realized I was in way over my head. Sarah suggested I just try running it (with no blade), so I did. It fired up on the first pull, and ran smoothly as I let it warm up and then let it pull me up the hill and around the yard. 

I decided not to try to adjust things after all!

1love 
Andy

Saturday, June 8, 2013

Urgent Garden Updates

First of all:
!!!!!!

Also: 
Beans, beans!

Can Collards overwinter?
 It would appear so. We found this munchkin growing in a pot we neglected last year and figured we'd try it again.

Does anyone know what this is?
I thought maybe some squashy relative but I don't know. I am going to leave it there and see what happens.

I got Andy these future pickles the other day:

Check out the whole scene and the trim lawn surrounding it! So exciting!